How to Sew a Fabric Book Cover (Beginner-Friendly)
- Faith St Juliette

- Aug 5, 2025
- 4 min read

Did you ever have a project idea pop into your head that makes you think, “Now why didn’t I do this sooner?”
That’s exactly what happened when I looked over at my journal the other day. The cover was… fine. But “fine” isn’t my style. I wanted something cheerful, colorful, and me.
Then I remembered that pink-and-white quilting fabric I picked up at QuiltCon a few years ago (you know, that fabric I’ve been saving for “something special”). Well, this was the day it went from sitting in my stash to becoming a fresh, happy cover for my journal.
This project is easy, quick, and perfect for back-to-school season (or just because you’re feeling blah about your journal cover).
I used my Baby Lock Accomplish 2 for this project, and let me just say—And let me tell you it was a total MVP for this project. This machine breezed through those folded edge layers like it was sewing through butter. No skipped stitches. No bunching. Just smooth, beautiful seams.
So let’s make one together!
Supplies
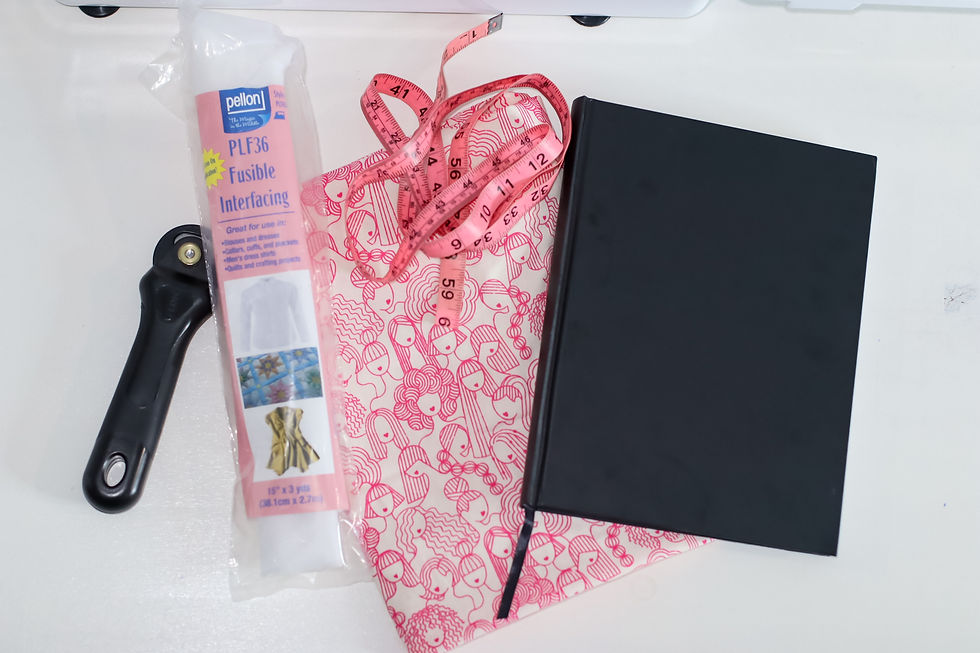
Notebook, textbook, or journal
fabric
fusible interfacing
measuring tape
rotary cover
1. Measure and Cut Your Fabric


With your book closed, measure from the edge of the back cover around to the edge of the front cover.
My journal measured 17 inches.
Now measure the height of the book.
Mine was 11 inches.
To make the cover fit nicely:
Add 8 inches to the width.
Add 2 inches to the height.
For my journal:
Width: 17” + 8” = 25 inches
Height: 11” + 2” = 13 inches
Draw out your measurements on your fabric. I’m using a lightweight quilting fabric, so I doubled it up for extra structure. If you use outdoor fabric or home décor weight, you can skip doubling.
✂️ Cut two pieces of fabric to size and one piece of interfacing.


2. Prep Your Fabric Layers

Lay the two fabric pieces right sides together.

Iron your interfacing onto one side of your fabric piece.

Either:
Stitch around the edge (1/2 inch seam allowance) to hold them together. Leave a one-inch opening to turn the fabric right side out.
clip raw edges about 1/8 inch
Turn the book cover right side out, press it flat, and then edgestitch or slipstitch the opening closed.
3. Sew the Folded Edges
To give the short edges a clean finish:
Fold the ends in about 1/2 inch and press.
Stitch down the fold on both short edges.
This is where my Baby Lock Accomplish 2 came in clutch. Even though I had two layers of quilting cotton and interfacing, the machine just zipped through the folded edge without any hesitation. That speed and power? Chef’s kiss.
Tip: Pressing is your best friend here. Crisp folds make your final book cover look professional.
4. Create the Pockets

Lay your book flat on the right side of the fabric and center it. You should have about 4 inches (or a little less) on each side.

Fold the fabric ends over the front and back covers. Pin at the top and bottom of both pockets. Make sure your book still closes comfortably.
Mark a line about ⅛ inch from the top and bottom of the book cover corners. These lines are your sewing guide for the pocket seams.
5. Stitch the Pockets

Sew along your marked lines. This locks in the pockets so your book won’t slide out.
Then, clip the corners to reduce bulk. Turn the cover right side out and give it a good press.


6. Finish and Insert Your Book

Press the pockets flat. Slide your book cover into place, tucking each side into the pockets.

That’s it! You just made a fully customized, reusable, and washable book cover.

Why I Love This Project
Quick – You can whip one up in less than an hour.
Customizable – Choose any fabric to match your style.
Practical – Protects your books, journals, and planners.

Helpful Tips:
If making for kids, choose a durable cotton canvas or outdoor fabric.
For extra structure, add fusible interfacing between your fabric layers.
Prewash your fabric first to avoid shrinkage later.
Final Thoughts
This is great back-to-school project to protect and beautify all your kids’ books and binders. If it’s for you, you can still use book covers in a decorative way on your journals, planners, etc. You can also use book covers in a decorative way on your shelves or coffee table.
So go grab that fabric you’ve been “saving” and give your books a makeover. Trust me, you’ll never look at a plain cover the same way again.

Thank you so much for taking the time to stop by and read this tutorial. 💖 I truly hope it inspires you to grab that fabric you’ve been “saving” and turn it into something beautiful and useful. Whether you’re covering a journal, planner, or a favorite book, my hope is that this little project sparks joy every time you pick it up.
Until next time,
Stay creative, stay joyful, and keep minding your purpose.

Faith, I have made these but a little different! I do believe I will be make this one soon ! oh, thank you for the scripture!!!
Thank you,
Jamie
Great post friend!